
Mr. Fixit: Where is the Low Side Service Port?
An automotive air conditioning system is a closed loop. As the refrigerant moves through the system it is subject to pressure variations which change the phase of the refrigerant from liquid to gas and back again. As these phase changes occur, the temperature also changes, heat is released, and “air conditioning is made”! Because of this, one side of the system is always under “high pressure”, and the other is “low pressure”. It is important when charging a system that the refrigerant is only added to the low pressure side port. But how exactly do we identify the low side port?
The exact location of the low-pressure port varies between car makes and models, but it is easily discoverable with just a few simple steps:
(1) Open the hood of the car and secure it.
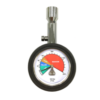
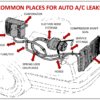
(2) Locate the A/C compressor. This will be attached to the front of the engine and is one of the units you’ll see that is powered by the engine’s belts. This may either be at the top or down along the side of the engine. For reference, your compressor should look similar to the following:

(3) The A/C compressor has two stainless steel tubes coming from it. The narrower tube is the high-pressure line and the wider one is the low pressure line. Follow the wider tubing from the compressor until you reach the low side port. It should have a plastic cap on it (usually blue in R-134a vehicles, or black in R-1234yf)

(4) Remove the cap covering the service port and attach your coupler. You’ll know you’ve found the correct port if the coupler locks into place. The high side port and low side port are different sizes, so A/C charging tools will only fit on the low side port.
Voila!
LMK 2021
Popular News
-
1
-
3
-
4
-
5
![]()
FJC
207 Talbert Pointe Drive
Mooresville, NC 28117
FJC is a manufacturer and nationwide distributor of quality automotive air conditioning parts and service accessories.